Capture the Flag
This page describes the basics of Capture the Flag in Armagetron and goes into a description of 4v4 tournament play as it evolved over the years 2008-2012. For information on how to set-up a Capture the Flag server, visit the Sty page.
Positions
Attackers
Generally, there are two attackers who work as a team to capture the enemy flag. In most cases, one is the primary attacker and keeps constant pressure on the defense, usually by leading a few meters ahead of the defender and looking for a way in. The secondary attacker will either attack along with the primary, or hang back a little bit and prepare to base-camp if an opponent dies. It is crutial for attackers to develop excellent communication between them because one of the most important tactics in CTF is holing. They need quick reflexes and a great understanding of what the other is doing so they can scoop up a flag in an instant.
Defender
The defender's job is secure the "flag space." Notice it's not just the flag that needs to be protected, but the space the flag occupies when missing. It must remain clear at all times. If the flag is captured and then returned, it will be captured again immediately if enemies are not vacated! To learn more about flag space, see floor textures lower on this page.
For those just starting out, there is a defense manual that can teach you the basics of solo defending. The manual doesn't provide tips on how to cover holes, but that skill should come naturally once you develop the ability to predict them. Players who don't want to take the time to learn proper defense can use the simple, interlocking "step-def." It's super effective at keeping people out, but practically useless against holing. Note: this is best used as an outer-defense.

Support
The term "support" was first coined by Leviathan. This position is also referred to as sweeper since some of what support does is similar to sweeping in Fortress, and this term predates support.
Support is the most versatile position and those playing it needs to be familiar with all aspects of the game. It's not uncommon for support to defend the flag, base-camp, and hole for the attacking team -- several times in the same round! Support's main duty is to help the primary defender set-up/recover defense and respawn attackers. Since both the flag and base are in constant danger, support needs to have keen observation skills and be ready to change positions in an instant. Similar to sweeping in Fortress, support will often need to cover holes in defense if the primary defender can't manage it in time. Support players are expected to play on both sides of the grid frequently. They need to be good at driving very fast!
Tactics
For a good historical look at Capture the Flag tactics, check out this forum thread from the birth of the game. There is a lot of helpful information there, some of which still applies and will be reiterated here.
Grinding and Setting Up
There is currently no perfect grind or setup for serious play. Players will sometime change position in the grind depending on which side the flag is on (determined by score: right side if you are in the lead, left side if you are behind). Everyone does their best to try and stop opponents from grinding down the center for quick access to the flag. Teams almost always use 2 attackers (sharing the duties of holing and base-camping) and 2 defenders set up as inner/outer defense, or as defender and sweeper (sometimes called support) who is responsible for re-spawning the offense.
Since protecting the flag is the most important aspect, the defenders usually take inside positions on the grind for speed. Some defenders like to start from position-1 and double-back through the grind to whip around the flag. It takes close teamwork to set up a proper double defense, so practice with your teammates whenever you can. Another setup is to have the defender on the outside (position-4), have them die at start, re-spawn them, and let them use cycle invulnerability to enter the outer-defense. This trick has been called “ghosting,” though there appears to be no formal name and the tactic seems to have originated in Untitled Clan.

Regardless of your positions, it's vitally important to stop your opponent from out flanking you or driving down the center of your grind. Break early, take your time, do it right.

Defense
You need a primary defender to surround the flag. They needs to be good at covering holes because they may be left alone at times.
But more important than a good primary defender is the ability for two defenders to work together to stop holing and keep the attack alive by using double-defense or def + support. Like the attacking team, defenders need good communication too. Double-defense is more secure but leaves your base open for camping. Def + support is more flexible, but puts more pressure on the primary def. Deciding which to use is a team choice, depending on your opponent of course. One tip for double-defense is: leave space between the walls greater than the explosion radius (2 meters) so a hole in the outer defense doesn't create a hole in inner defense. Do this when possible.
The secondary defender must always keep a keen eye on the base. If it is in danger of being camped, it might be beneficial to break off and protect it. And when your team has a player advantage, be courteous and extend your trail for newly respawned attackers to speed across the grid! :D
Offense
The popular way to win CTF matches is heavily work the player advantage. Try to get the first kill, then surround your opponent's base to prevent re-spawning. Use your extra manpower to setup a 4v1 situation, then flag-run.
Base-camping
Surround your opponent's base to prevent them from re-spawning and/or scoring a flag. The person base-camping needs quick reflexes and must be able to re-spawn the enemy quickly if they suicide to end a round.
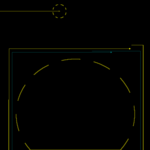
Holing
Properly executed holing is essential. Too many teams hole lazily and lose all the points a captured flag might award. Take your time, do it right, don't fail too many times. Maximize your efforts by only allowing 1-2 hole attempts per flag. If you fail that second time, don't try again until the next flag. It's in your best interest to practice with a teammate and get the holing technique perfected. The ability to hole for the flag quickly and effortlessly can be crucial in close game.
In addition to holing, attackers should learn the art of fake holing. A good defender will be able to predict holes. So, setting up for one and burning some rubber then aborting should cause the defender to adjust; thus making his defense less manageable.
- Holing Examples
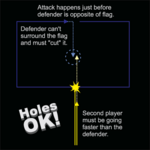
Holes OK!
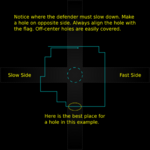
Holing in detail.
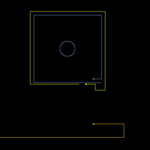
NPH for flag.
Works great against base-camping too.


Flag Running
After you capture the flag, keep your opponent on the ropes by controlling their flag space. One player should capture the flag, then pass it to a teammate using the /drop command for a return. Bisecting the flag and enclosing an area opposite the base will make it harder to lose control of the newly conquered flag space. Note: You should bind the /drop command to in instant chat button that's easy to hit quickly under pressure! Flag-running is a team effort. You want to get the flag home as fast as possible. This might mean having the support position extend a trail to grind mid-way up the grid for a faster return.


Strategy
The following describes popular situations in a 4v4 tournament. Unlike Fortress where player advantage and position is important but not essential, CTF requires strict observation of all the focal points on the grid. It's almost like chess, and you have to cover the important pieces. Position is just as important as skill, and working the player advantage makes all the difference in the game. Note: drawings are written from the perspective of Team Gold.
1v4
If you are the last person alive on your team, you're probably the defender. Your best bet is to defend to the end. Take out as many opponents are you can before your flag is captured. And when it is, die immediately to stop the round and prevent the flag from scoring. If your opponent has slow reflexes the round will end, stopping a flag-run. If not, you and your team will be alive again. Take back your flag space!
2v4
When down by two players, it's tempting to try and re-spawn your mates. Don't, unless you are playing a weaker team and you can break the base-camp in a few seconds. The best thing to do is for both players to protect the flag, You'll probably kill a bunch more and hopefully negate any flag points they might get later.

Alternatively, when facing a team 2v4 (with your defense still up), you can base-camp. This is good in case your defender kills an enemy or if they hole to get the flag. It brings the game down to a 2v3 and you control their spawn. Your opponents will most likely leave base-camp to hole your base-camp. In this time the defender should respawn the team and setup defense again.
2v3
Let's imagine they have the flag and your base is properly camped. It your opponent is strong, you may find it too difficult to break their defense or their base-camp in the time it takes to break yours. Carefully double-team the flag-holder and try to knock it loose. The added pressure might make one of your opponents change position an give you a much needed opportunity.

2v2
The following 2v2 situation is rare, but can result in a virtual stalemate. You're best bet is to go for your base to respawn and ignore the enemy flag since he is locked in place by your base-camper.

3v4
This is the pivotal point of the round. The goal is to convert a 3v4 situation to a 4v3. Below is one possible scenario.


4v3
Base-camp! (Hahaha) But no, really, this should be like a reflex. Base-camp as soon as you gain a player advantage.
3v2
In this situation it's really in your best interest to free up your base and get dead teammate back in the action. Do what you can to put pressure on the base-camper, even holing it. You should be able to recuperate those lost points in no time as you overwhelm your enemy. Camp their base and divert attention from your flag.
4v2
Keep up the pressure. Take them out one at a time, or use your re-spawning capabilities to hole for a capture (or just to break outer defense) and set up a flag-run. Note: it's totally possible to no-point-hole (NPH) in this situation. See illustration.

4v1
This is the point where good teams show their stuff. Everyone has a job to do, and if done right, you can set up a brutal flag-run and seal the match in your favor.

Tools
Floor Textures
Knowing where the flag is when not at home is important beyond measure. The use of custom textures to map out flag positions is probably the single-most important change to the game. They are widely used with many variations. Here is a decorative one as a moviepack. Having a custom floor means the difference between getting/losing one flag, or many, many flags. The defense manual linked to in the upper section of this page has a texture included.
If you don't want to use a custom texture (or can't afford the fps), you can still have their benefit. If you use the default floor in the game (the grid), you can set GRID_SIZE to 25 or 12.5 and it will show the position of the flag rather nicely.
VoIP
If you want to win tournaments, you'll need to talk to your teammates in real-time. CTF is fast-paced and decisions need to be made faster than you can type. Use TeamSpeak, Mumble, Ventrillo, or Skype to prevent your team from being disadvantaged.